Aug 19

3D Design and Printing Fun

I have finally got around to posting again after returning from Timor Leste a few weeks ago. I think I was a bit flat after the trip and took a while to shake off a persistent cold. Ah well, it is the time of year for such things. Anyway, the cold has gone and my enthusiasm has returned – Yay!

As a bit of a change, I thought I might post a quick couple of bits about some 3D design and printing I have been doing (partly work related). You may remember that I have an interest in 3D printing and design, and other fabrication activities, and I posted a bit about itย here.

tincercad-samples

I am lucky enough to have access to a 3D printer and some other fabrication equipment at work and it has been a bit of fun and a little bit of hard slog, to learn how to get a design from concept, into a 3D design, then 3D printed, and finally to have the completed piece in place doing the task. OK, it’s been a lot of slog but heaps of fun ๐Ÿ˜‰

The main thing I wanted to make was a bracket to hold a computer fan on a box for a project we are building for a virtual reality display, as part of science week. I thought it would be appropriate to quickly design and print the bracket rather than modifying an existing bracket. It ended up harder than I expected, took much longer than I had anticipated, and became a very good learning experience.

I decided to use a very simple free online program called Tinkercad (www.tinkercad.com)

tinkercad-screen
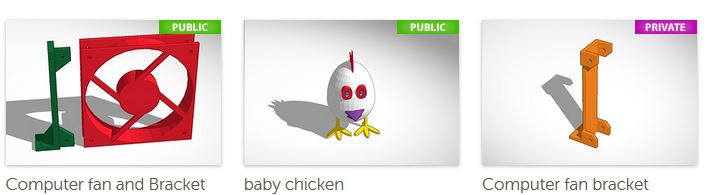
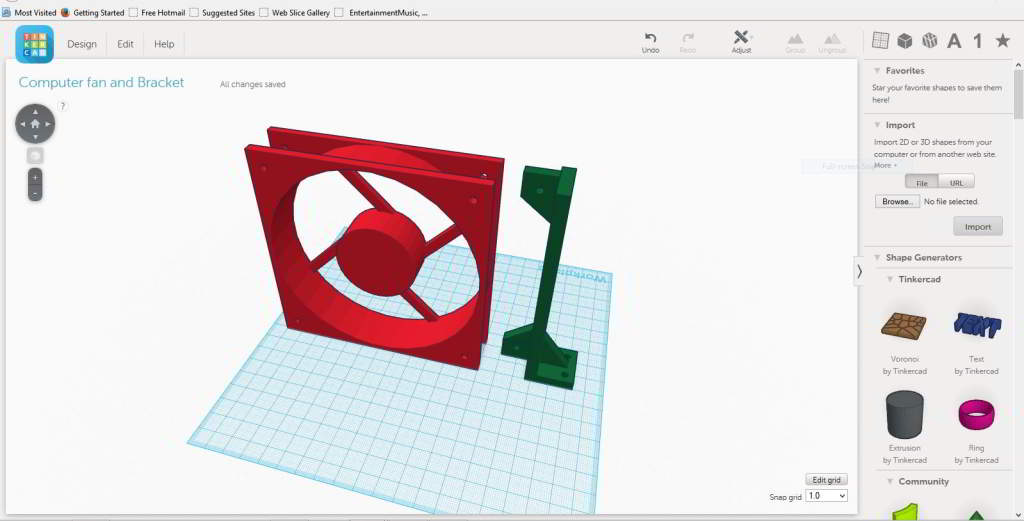
It does have some limitations but it is easy to use with a simple drag and drop technique. It takes a little getting used to, like any 3D program, but it is surprising how quickly you can get the hand of it. The picture shows the 3D model I made of the computer fan along with an early prototype of the bracket I designed.

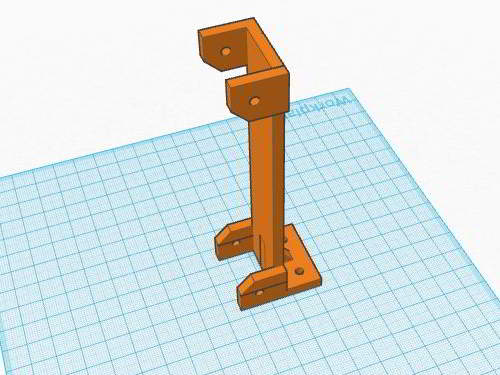
There were a couple of problems with the bracket and I ended up changing the design to the one shown below.

bracket-imageOf course I needed two of them, so I uploaded the file into the 3D printer, printed one to make sure everything was OK and then printed the second one.

brackets with fan
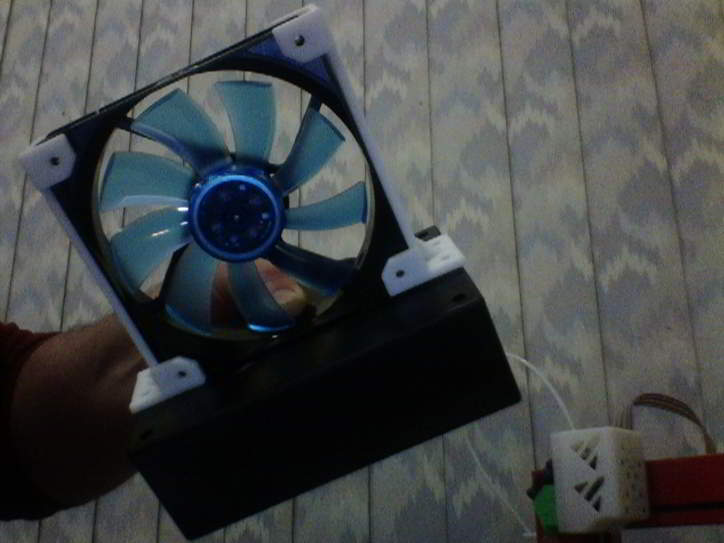
They worked a treat and I am very happy with the final result.

This kind of manufacturing and construction is on the increase and promises much. It will be interesting to see how it is used as the prices keep dropping and the technology makes it’s way into the home, office and small business.

Just for a bit of fun, after the brackets were completed, I very quickly threw together a few fun parts to make this creation, I call baby chicken (after all, there had to be a permaculture theme somewhere in this postย  ๐Ÿ™‚ ย  ).

It’s interactive so press the 3D button and have a look ๐Ÿ˜€

What do you think of this post?
  • Awesome (6)
  • Interesting (7)
  • Useful (4)
Jun 22

That Garden Bed

Oh, remember that garden bed I mentioned in the previous post, you know that one that also featured in a a very early post (here)?

newgardenbed001

Yes, that’s the one. Well I did a bit of work on it last month and, of course, there was a bit of scope creep, and the simple cleanup turned into a major refit!

It all started when I decided that I wanted to redo the borders as part of the preparation and general cleanup prior to our Permablitz in August (Oh, have I mentioned we’re having a permablitz?ย  ๐Ÿ˜‰ ). I will provide some more detail closer to the date but you can also find all the details at

http://www.permablitz.net/calendar/icalrepeat.detail/2014/08/30/525/-/permablitz-159-st-albans

Anyway, I started with a simple idea. Remove the existing rotting red-gum sleepers and replace them with newer bits. Sounds simple, right? and it would’ve been, but…I got to thinking (oh, oh).

Since the original bed was built, I have installed a grapevine trellis running behind it with some mesh fencing and steel posts for support. Wouldn’t it be nice if I could use these posts as the corner posts for the sleepers together with the posts at the front that support the verandah and storm water pipes to the tank.

gardenbed-upgrade-01
But, of course, the existing posts were in the wrong spot to make it work properly so they would have to come out and be repositioned. Which meant dismantling the fence and unhooking the trellis wire supports for the grapevine.

I would also need to place a new post in the other corner to complete the process.


gardenbed-upgrade-04


So there was nothing for it but to start digging!
gardenbed-upgrade-05


And more Digging!


Now, there was a bit a planning involved before all that hard work. For example, making sure that the bed lined up with the trellis and support fencing, and was positioned away from the boundary fence which is overdue for replacement. The idea was to make the mesh fence double as a brace for the trellis and a climbing frame for plantings in the bed. It was also important that everything was square.

So how do you make sure that everything is square. Good old Pythagoras provided the answer a few thousand years ago. The diagram shows some of the measurements used to make sure the posts were going into the right place.ย  The second set of measurements with the dotted lines show the results of scaling up the classic 3-4-5 triangle to get a right angle (90 degrees) as a check.

gardenbed-upgrade-06
gardenbed-upgrade-07gardenbed-upgrade-08

I decided to concrete these posts in place because I needed them to be solid. The trellis wires are under tension and the original posts had moved a little, despite the bracing, and it was also going to be used as a climbing frame. Suddenly, the next bit of scope creep appeared! If I made the posts a bit longer and put some horizontal bracing between the four corners, Iย  could drape plastic film over the whole lot and make a temporary greenhouse for winter and extend the growing season in the new bed!

Damn! now I had to bolt some extensions on the bottom of the second hand posts to extend their height for the greenhouse idea. Oh well! it’ll be worth it ๐Ÿ™‚

gardenbed-upgrade-09gardenbed-upgrade-10

At this point a friend said to me, “why are you mucking around with the grinder making brackets from old bits of post scraps when they’re so cheap at the hardware store?”

To be honest, had I realised the work involved, I may have done just that. However, I enjoyed making them and I was able to re-purpose some material that would have ended up in the scrap bin rather than buying new material.

So I cut up the brackets, drilled the holes for the mounting screws and sprayed them with anti-rust paint.
gardenbed-upgrade-11 gardenbed-upgrade-12 ย  ย ย  gardenbed-upgrade-13

Then it was just a matter of bolting the brackets to the posts at the right height and bolting the sleepers to the brackets. Easy ๐Ÿ™‚
gardenbed-upgrade-14 gardenbed-upgrade-15ย ย ย ย  gardenbed-upgrade-16

Now at this point, with some of the sleepers in place, I needed to put in an extension support because the sleepers were not long enough for the garden bed. I had already done this at the rear of the bed with a post because I wanted the mesh fence for the climbing frame but what was the best way to do this at the front of the bed, and then…more scope creep!!

What about putting another post at the front and extending it later to the top support for the pipe to the tank? That way I could install a door and make the greenhouse more permanent. No problem!

So in went another post making a 900mm opening and the remainder of the sleepers.
gardenbed-upgrade-17gardenbed-upgrade-18
gardenbed-upgrade-19
gardenbed-upgrade-20


The finished Product Tada!!

“But what about the soil?”, you ask? “Oh yeah!” Ok, let’s get some soil and chicken manure into the bed.

gardenbed-upgrade-21
gardenbed-upgrade-22gardenbed-upgrade-23
gardenbed-upgrade-24
gardenbed-upgrade-25

That’s Better !! Several barrow loads of composted tree pruning and chicken manure later and it’s finished.

Even the basil and capsicum survived the rebuild.


gardenbed-upgrade-26

I have since re-attached the vine trellis, planted out some peas, broad beans and garlic and they are doing well. I’ll post some more pictures in a few weeks.

So now I have a much larger garden bed complete with built in climbing frame and provision for turning it into a greenhouse in the future.

It was supposed a one day or casual weekend project but it morphed into quite a large project that ended up taking several days over three weekends to complete but I am very happy with the result.

Got any projects planned for your backyard?

What do you think of this post?
  • Awesome (3)
  • Interesting (2)
  • Useful (2)
Jun 21

Chic Chic Chic

It’s always the way that, before you go away for any reason, you realise all these jobs have piled up and you’ll never get them all done in time, and so it was before I headed over to Timor Leste for three weeks to do some training work and volunteering in Renewable energy for the ATA (www.ata.org.au).

Some many jobs and so little time. I did a lot of work getting the greenhouse re-organised, a new garden bed built and planted out, planning for our upcoming permablitz in August and a myriad of other little jobs around the house.

One thing I have been wanting to do for a while is add a few layers to our chicken flock since the original girls are off the lay and I actually had to buy eggs last month!!! (I know! Right?).

Fortunately, the local pet store had a few point of lay ISA Browns for sale when I went to get food so I bit the bullet and bought three. They were more expensive than the last place but I saved all that on petrol plus time so it was worthwhile all round.

Real Chicken-in-a-Box

Real Chicken-in-a-Box

Checking Out the New Home

Checking Out the New Home


They’re fitting in well now that the pecking order has been re-established and I had eggs the next day! Woo Hoo! Backyard Eggs on Toast for breakky – YUM!

I’ll have have plenty of eggs when I get back from TImor Leste in a few weeks and, not long after, the older chooks should be back on the lay ๐Ÿ™‚

How are your layers doing this winter?

What do you think of this post?
  • Awesome (1)
  • Interesting (2)
  • Useful (0)
May 15

Growing in the Greenhouse

Well, after cleaning up and rearranging the greenhouse, building the wicking tubs and planting the seeds it was just left to wait and see how well the seeds would germinate.

We have been lucky to have some mild weather to help start them off and they seem to be doing very well. Beans at the back, cherry tomatoes in the middle and spring onions at the front.

greenhouse-seedlings-01I also took the opportunity to rescue some pot-bound pups of various grasses etc. from friend’s severely neglected pot-plants which I will grow a little bigger before planting out in the front yard. I couldn’t even tell where I removed them from the original pots they were so overgrown. They also seem to be doing well.

repotting-02 repotting-01


Now that I have made a good start in the greenhouse it’s time to get serious and get a lot of winter greenhouse planting done and seedlings started for my upcoming permablitz in August.

“Permablitz?”, you ask! Aaah! That’s a whole other exciting story and the subject of a complete post of it’s own, coming soon.


What do you think of this post?
  • Awesome (0)
  • Interesting (3)
  • Useful (3)
Apr 20

Making up Some Pseudo Wicking Tubs

Now that I have the Greenhouse re-arranged it’s time to get some growing happening.

The first things I wanted to put in place were some tomatoes and beans on the climbing frames. I bought several bags of “Tomato and Veggie” potting mix on special and decided to use this in some tubs.

Last time I used the tubs I had some drainage holes near the bottom but the tubs kept drying out too quickly. I thought about constructing some proper wicking beds using the tubs but I wanted to use what I had on hand and didn’t really want to go through the extra effort of assembling the wicking bed. I needed a short-cut, a work-around, another way. So this is what I did.

I reasoned that, if the bottom of the potting mix was kept saturated and the plants were relatively shallow rooted, then they would have the advantage of the water wicking up from the bottom and also get oxygen because the top would not be saturated. Hopefully the potting mix a t the bottom would stay in good condition for the time it took to harvest the crops. Then it could be remixed or used as compost on the garden. It sounded reasonable to me anyway ๐Ÿ™‚

greenhouse-tubs-01 greenhouse-tubs-02

So, it was just a matter of drilling some drainage holes relatively high on the tub at both ends to keep the additional water in the tub. After much gnashing of teeth and procrastinating, I settled on a little over 125mm from the bottom. Mainly because it was less than half way up the tub and also about one hand width, including thumb, which made it easy to measure.

greenhouse-tubs-03


Once the holes were drilled in both end of both tubs, it was off the greenhouse to fill the tubs with potting mix and place them in position. The only extra job I had to do was seal the original holes on one of the tubs with some hot melt glue and small squares of plastic


I planted a mix of climbing beans at the back followed by cherry tomatoes in the centre and spring onions at the front.

greenhouse-tubs-04 greenhouse-tubs-05

greenhouse-tubs-06 greenhouse-tubs-08

greenhouse-tubs-09


A quick soak until the water started to dribble out of the drainage holes and it was done.


greenhouse-tubs-10


It will interesting to see how well it works.

I’ll provide regular updates on the progress of the plants and we’ll see if the simplified construction does the job or if I have to go back to drawing board ๐Ÿ™‚

What do you think of this post?
  • Awesome (1)
  • Interesting (5)
  • Useful (3)