Apr 15

Blackout!

We had a blackout today just before dusk. “No Problem”, I thought, “we’ll just get out the the torch and the portable energy pack” as I smugly wandered into the garage.


The portable energy pack consists of a deep cycle battery, lighter socket and 300W inverter all mounted in a small toolbox. I built it a while ago and it is a handy little unit. It is designed to portable and recharged via solar or charger and is a great little unit for camping and travelling.

Well I pulled it out and, “Hey Presto“, nothing happened! What? What’s happened?
It turns out that the battery has died unexpectedly. Grrr! Now what?

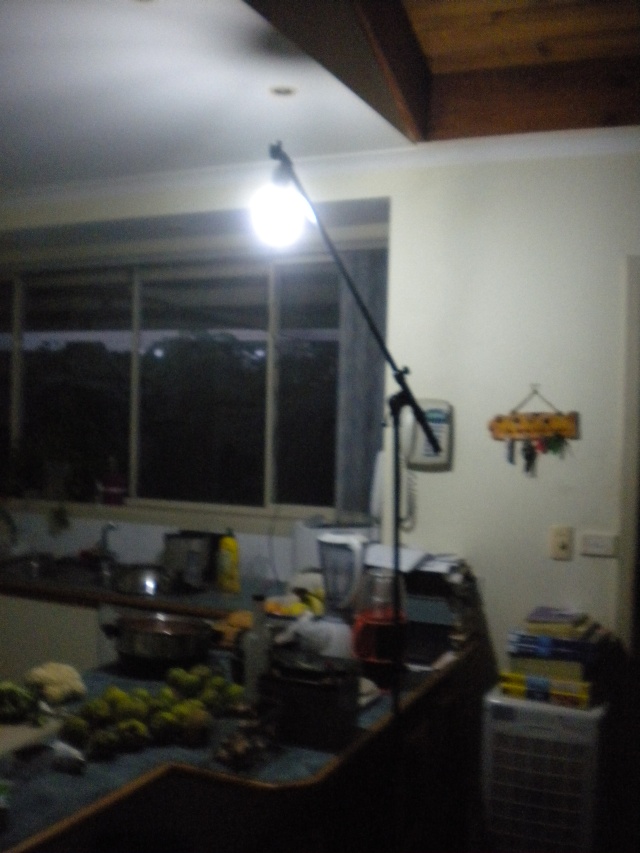
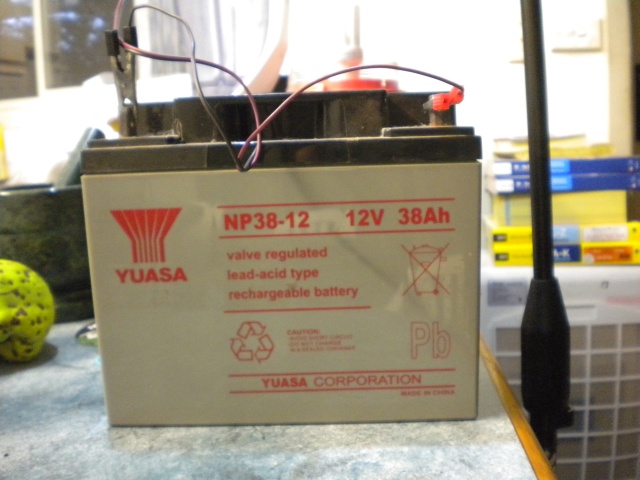
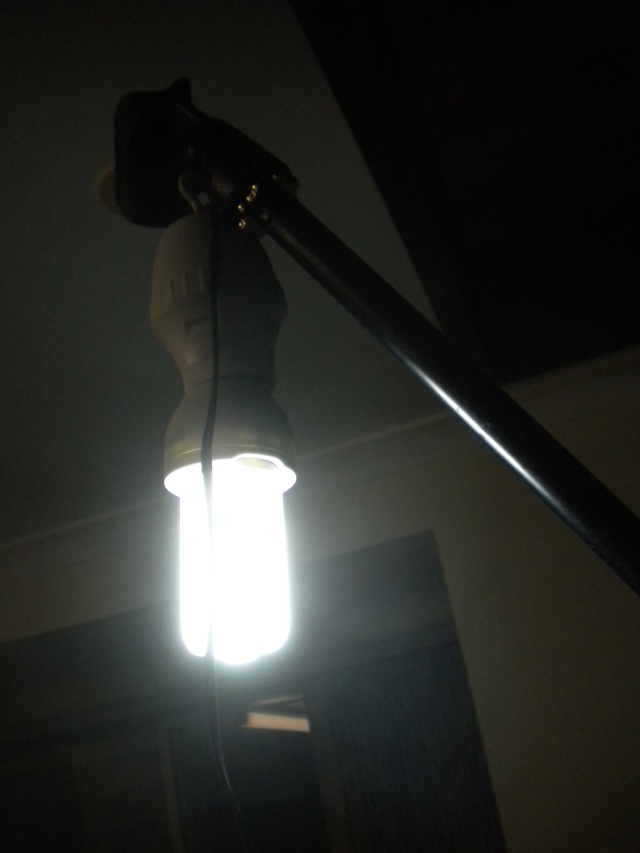
Fortunately, I have other solar related gear available from various projects so I quickly set up a temporary light in the kitchen with a spare 38Ah 12V battery and a neat little lamp batten with a built in 240V converter so it can be connected directly to battery. I works well with some CFLs, but not all, so you need to try a few different brands to make sure you have a working system.  I grabbed a mic stand from the music gear to use as a support and “Hey Presto” for real this time.

Now that we had light in the kitchen I was able to leisurely start setting up another battery and the inverter to connect some more portable lights and any other light duty appliances we might want to use. Fortunately the power came about an hour later and before we needed anything other than the single light in the kitchen.

But is just goes to show the value in having some backup. It doesn’t have to be a complex setup. Some torches or even a candle or two and some matches (which we also have) is fine. It is also important to regularly check the backup to make sure it is still works correctly (something I hadn’t done 🙁 ).

So now it’s time to give the little energy supply an overhaul. I might upgrader to a bigger unit. It might be a little less portable but the bigger batteries that I have are better suited to the job than the cheap small battery I originally used. I will also set up a better charging/monitoring system for this one.

What do you think of this post?
  • Awesome (2)
  • Interesting (3)
  • Useful (3)
Apr 12

The Ginger vs the Pot!

I must admit, I love ginger, the smell, the taste and the look, from the tropical like fronds to the deformed looking roots (or hands). In stir fries, in jams, candied, even in chocolate! and of course in Ginger  Beer, it is a fantastic plant.

I had tried to grow it a couple of times with mixed results. So about two years ago, after a friend and I built a large greenhouse, I took the opportunity to take a sprouting piece in the cupboard to try again. I planted the hand in a pot and placed it in greenhouse and away it went. The following season it had grown enough to be repotted into two pots and to have enough to use some in the kitchen. Every so often we would just reach into a pot and retrieve a piece. However, a few weeks ago I noticed that one of the pots seemed to be leaking water everytime I tried to fill it. A closer examination revealed that the roots had grown so much they had split the pot!! Time for repotting methinks.

Here’s a quick photo record of repotting the Ginger. It was repotted into two new pots.

And safely back in its home in the greehouse next to the Avacado. Over winter I think I will consolidate all the ginger into a larger tub to give it more room to expand and so it is a bit easier to manage.

What do you think of this post?
  • Awesome (3)
  • Interesting (6)
  • Useful (3)
Apr 12

Inspired!

Today I had the pleasure of visiting Gavin Webber and his family and getting a guided tour around his sustainable house complete with solar power, vegie garden, fruit trees, chooks and much more.

That’s not that remarkable, you might say, there are a few people around who have similar setups. Well that is (sort of) true. What IS remarkable is that they have turned their lives around over a very short period of time and have shown how easy it can be when you have the will and drive to do it.

Gavin is a self confessed “ordinary bloke” who had an epiphany while watching “An Inconvenient Truth”. This set him on the path to reduce his carbon footprint and make changes to his lifestyle to live in a more sustainable and planet friendly way. He and his family have acheived this without compromising their comfort and happiness. More than that, they have been documenting their transition on the very aptly named website,

The Greening of Gavin

It is a fabulous website and recently won the Alternative Technology Association Green blog award plus a few other online awards.

I took the opportunity to interview Gavin for my community radio show “The Good Earth” that airs live on 3WBC community radio on the first saturday of the month.

We had a great time, rambling on and discussing how he and his family have achieved so much in just a few short years. The interview will be aired in May and will be available on The Good Earth as well.

Gavin has fired me up to redouble my efforts just like many poeple who have met him or visited his website. Inspiring!

Thanks for a wonderful afternoon, the tour and the great chat over coffee. I have come away re-invigorated!

What do you think of this post?
  • Awesome (2)
  • Interesting (1)
  • Useful (0)
Apr 11

Propagating

Propagating is both fun and cost saving. There are several different propagating techniques including grafting and layering, but the two I mostly use are planting seeds and taking cuttings.

Planting seeds is the most common way many gardeners propagate plants, usually by using commercial varieties of seeds. More and more gardeners are using seed saving techniques to gather the seeds from the plants in their own gardens (or nearby gardens) and use these seeds for next years plantings. There are many benefits of saving seeds including, preserving unusual or heritage plants, developing plants that have been acclimatised to your particular garden and, of course, saving money.

Cuttings are another easy way to propagate plants by taking small pieces of existing plants and placing in a suitable growing medium (usually a good potting mix or seed raising mix but this can vary according to the plant) and letting them develop roots. Once the roots have developed and the plant is growing and healthy you can plant it out in its final position. Depending on the plant you either use softwood (still green and pliable) or hardwood (brown and stiff) cuttings. Some plants, such as grapes, strike very easily and quickly while others may take weeks or months.

Sometimes you will get a very poor strike rate and many of the cuttings will not grow. Don’t let it get to you! Remember, all it cost you was a bit of time. I usually put in lots of cuttings at the same time and then just pick the strongest growing ones, that way you almost always get enough even if something goes wrong.

Shown here are examples of both seedlings and cuttings. The plants on the left are seedlings from a pomegranate in a nearby house that has very sweet fruits. In the centre are a number of grapevine cuttings from some new vines I planted earlier in the year and finally there is another seedling that I think is a custard apple, but I’m not sure. My mistake for not labelling them! Oh well, time will tell. 🙂

What do you think of this post?
  • Awesome (0)
  • Interesting (1)
  • Useful (1)